top of page
Photo of a man wearing the IBD Aware sensor on his arm, intently viewing his health biomarker results on an iPad, demonstrating the ease of accessing real-time health data.

A Step-by-Step Guide to Get Started

Welcome to IBD Wearable! We're excited to have you onboard. This step-by-step guide is designed to help you seamlessly set up your new device. Whether you're a first-time user or returning for a refresher, we've got everything you need right here.

What's in Your IBD Aware Kit?

1 Reader

Image of IBD Aware Reader, an essential part of the IBD Aware kit, designed for Reading the IBD Aware sensor readings
Image of IBD Aware charger, an essential part of the IBD Aware kit, designed for charging the IBD Aware reader

4 Sensors 

Image of IBD Aware Sensors, an essential part of the IBD Aware kit, designed for sensing inflammatory biomarkers in a patient's sweat

4 Patches

Image of patches, an essential part of the IBD Aware kit, designed for keeping the reader securely and safely on the patient's arm.

4 Sterile Wipes

Image of sterile wipes, an essential part of the IBD Aware kit, designed for activating the sweat sensors.

Step 0: Follow our Video Guide, or Simply Review the Steps Below at Your Own Pace

(1) Adding a Device

(2) Syncing the Device

(3) Removing the Device

Step 1: Setting up the IBD Aware App 
(Currently available for iPhone users Only)

(1) Get the IBD Aware App

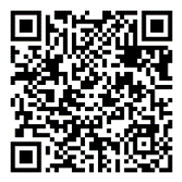
Scan the below QR code to install the Sweat Aware companion App 

QR code to the Sweat Aware app in the Apple store so users can use it to manage their IBD Aware device
The Sweat Aware app icon in the apple store that users will see when they download the Sweat Aware app

(2) Create your Account

Open the IBD Aware app and select 'Register' to set up your account

Step-by-step demonstration of to create an account in the app, showing the what the login screen looks like
Step-by-step demonstration of to create an account in the app, showing the what the registration screen looks like.

Step 2: Getting Your Reader and Sensor Ready

(1) Power Up Your Reader

Charge your reader for about 2 hours or until the solid Red light turns off. 

Step-by-step demonstration of how to power up the reader, showing what the side of the device where the charger port is.
Step-by-step demonstration of how to power up the reader, showing what the charger looks like

(2) Check Device Health

A Green light will flash every 15 seconds for connectivity. A Red flash is a measurement

IBD Aware device displaying a glowing light indicator, symbolizing active health monitoring
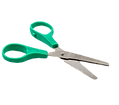
Step-by-step demonstration of how to open unpack a live sensor, showing what the scissors used to cut looks like.

(3) Unpack the Sensor

Carefully open a Live sensor pouch, ensuring the QR code remains intact

Step-by-step demonstration of how to open unpack a live sensor, showing what the sensor packet looks like.
Step-by-step demonstration of how to open unpack a dummy sensor, showing what the scissors used to cut look like.

Step 3: Pairing the Sensor with the Reader

(1) Align the Sensor Sticker

Align the Sensor sticker with the Reader sticker, ensuring it's opposite the small hole

Step-by-step demonstration of how to align the sensor sticker on the reader, showing what the sensor and reader look like.

(2) Insert Sensor in Reader

Turn the sensor over and gently push it into the reader using your finger

Step-by-step demonstration of how to align the sensor sticker on the reader, showing what the sensor and reader look like plugged into eachother

(3) Activate with Wipe

LIGHTLY press the sterile wipe onto the sensor for a moment to activate it

Step-by-step demonstration of how to activate the sensor sticker on the reader, showing how you take the sterile wipe and press onto the sensor

Sensor Activation - Video Guide

Step 4: Positioning the Device to your Skin

(1) Remove Patch Center

Remove the inner sticker from the patch, ensuring the reader is at hand as you prepare to place on your arm

Step-by-step demonstration of how to put the sensor on your arm, showing how to remove the patch's center.

(4) Secure Around Device

Press down gently around the reader to secure it to your skin, then peel off the white strips to finalize

Step-by-step demonstration of how to put the sensor on your arm, showing how to secure the device on your arm.

(2) Position Reader on Patch

Position the device at the center of the green line, sensor face up. Keep the white end peels in place

Step-by-step demonstration of how to put the sensor on your arm, showing how to put the reader in the center of the patch.

(5) Ensure Patch Adherence

Make sure the patch lies flat against your arm. The device should feel comfortable and secure on your arm

Step-by-step demonstration of how to put the sensor on your arm, showing how to adhere the patch cleanly on your arm.

(3) Position Reader on Arm

Place the reader smoothly on your arm. Choose an area free from scars or bumps and ensure your skin is dry

Step-by-step demonstration of how to put the sensor on your arm, showing how to put the reader on your arm.

(6) Let it Settle

To ensure the patch adheres optimally, avoid activities like exercising or showering for the next hour

Step-by-step demonstration of how to put the sensor on your arm, showing how to take care of it by avoiding exercise and showering shortly after

Step 5: Syncing the Sensor with the IBD Aware App

(1) Pair the Reader 

Navigate to 'My Device' on the homepage. Keep the device close to your phone (within a foot) and select it

Step-by-step demonstration of how to set up the app, showing how to pair the reader.

(2) Link the Sensor

Tap on 'QR Code Reader' and use your camera to scan the QR code from the sensor's packaging you opened earlier

Step-by-step demonstration of how to set up the app, showing how to link the sensor.

(3) Verify the Details

Verify that all details are filled in correctly, especially the 'Location'. Once confirmed, select '✔ Done'

Step-by-step demonstration of how to set up the app, showing how to verify your details.

Step 6: Personalize Your Profile
 
(While the Sensor Starts Gathering Data)

(1) Customize Settings

Tap the Gear icon located at the bottom right to personalize your settings and complete your profile

Step-by-step demonstration of how to set up the app, showing how to customize settings.

(4) Complete Health Profile

Fill out your IBD profile, detailing aspects like timing, severity, and type of IBD. This helps tailor analytics to your specific profile

Step-by-step demonstration of how to set up the app, showing how to complete health profile.

(2) Grant Doctor Access

Input your doctor's email to grant them access to your data via our Clinician dashboards

Step-by-step demonstration of how to set up the app, showing how to grant clinician access.

(5) Begin Journaling

Tap the Calendar Icon, followed by the '+' at the top right. This allows you to log factors, from food intake to vitals and medication

Step-by-step demonstration of how to set up the app, showing how to begin journaling in the app.

(3) Set Notification Prefs

Review the notification settings to ensure you receive reminders for data syncing and journal logging

Step-by-step demonstration of how to set up the app, showing how to set up notification preferences.

(6) Review Journal Entries

You have the freedom to choose what you track, but we provide analytics to correlate your inputs with your biomarker data

Step-by-step demonstration of how to set up the app, showing how to review journal entries.

Step 7: Start Your Health Monitoring in the App

(1) Initiate Device Sync

Navigate to "My Reports" and tap on "Sync". Ensure your phone is near the device. After a minute, you'll receive a confirmation of syncing

Step-by-step demonstration of how to set up the app, showing how initiatve device sync for health monitoring.

(2) Explore Your Data

Explore the chart to see your health metrics. Use buttons to switch biomarkers, body temp, and perspiration levels. Dive deep into your stats

Step-by-step demonstration of how to set up the app, showing how to explore your data for health monitoring.

(3) Choose a Data Date

Tap on the calendar date at the top to review your data. Dates with recorded data will be highlighted with a green dot.

Step-by-step demonstration of how to set up the app, showing how to see data across days for health monitoring.

Additional Information:
Tips for Device Management

bottom of page